Transaction Bundler
AAVE Leverage Lending with Compass SDK — Typescript
Leverage lending (“looping”) lets you boost yield by borrowing against your deposit, swapping the loan, and re-depositing — all to multiply exposure.
With Compass API TypeScript SDK, you can loop in one atomic call, no Solidity, no manual steps, minimal gas.
 In this example, you’re depositing USDC, borrowing ETH, swapping it back into USDC, and re-supplying — on repeat — to achieve a target leverage (e.g. 2.19x). Compass bundles all of this into one atomic transaction.
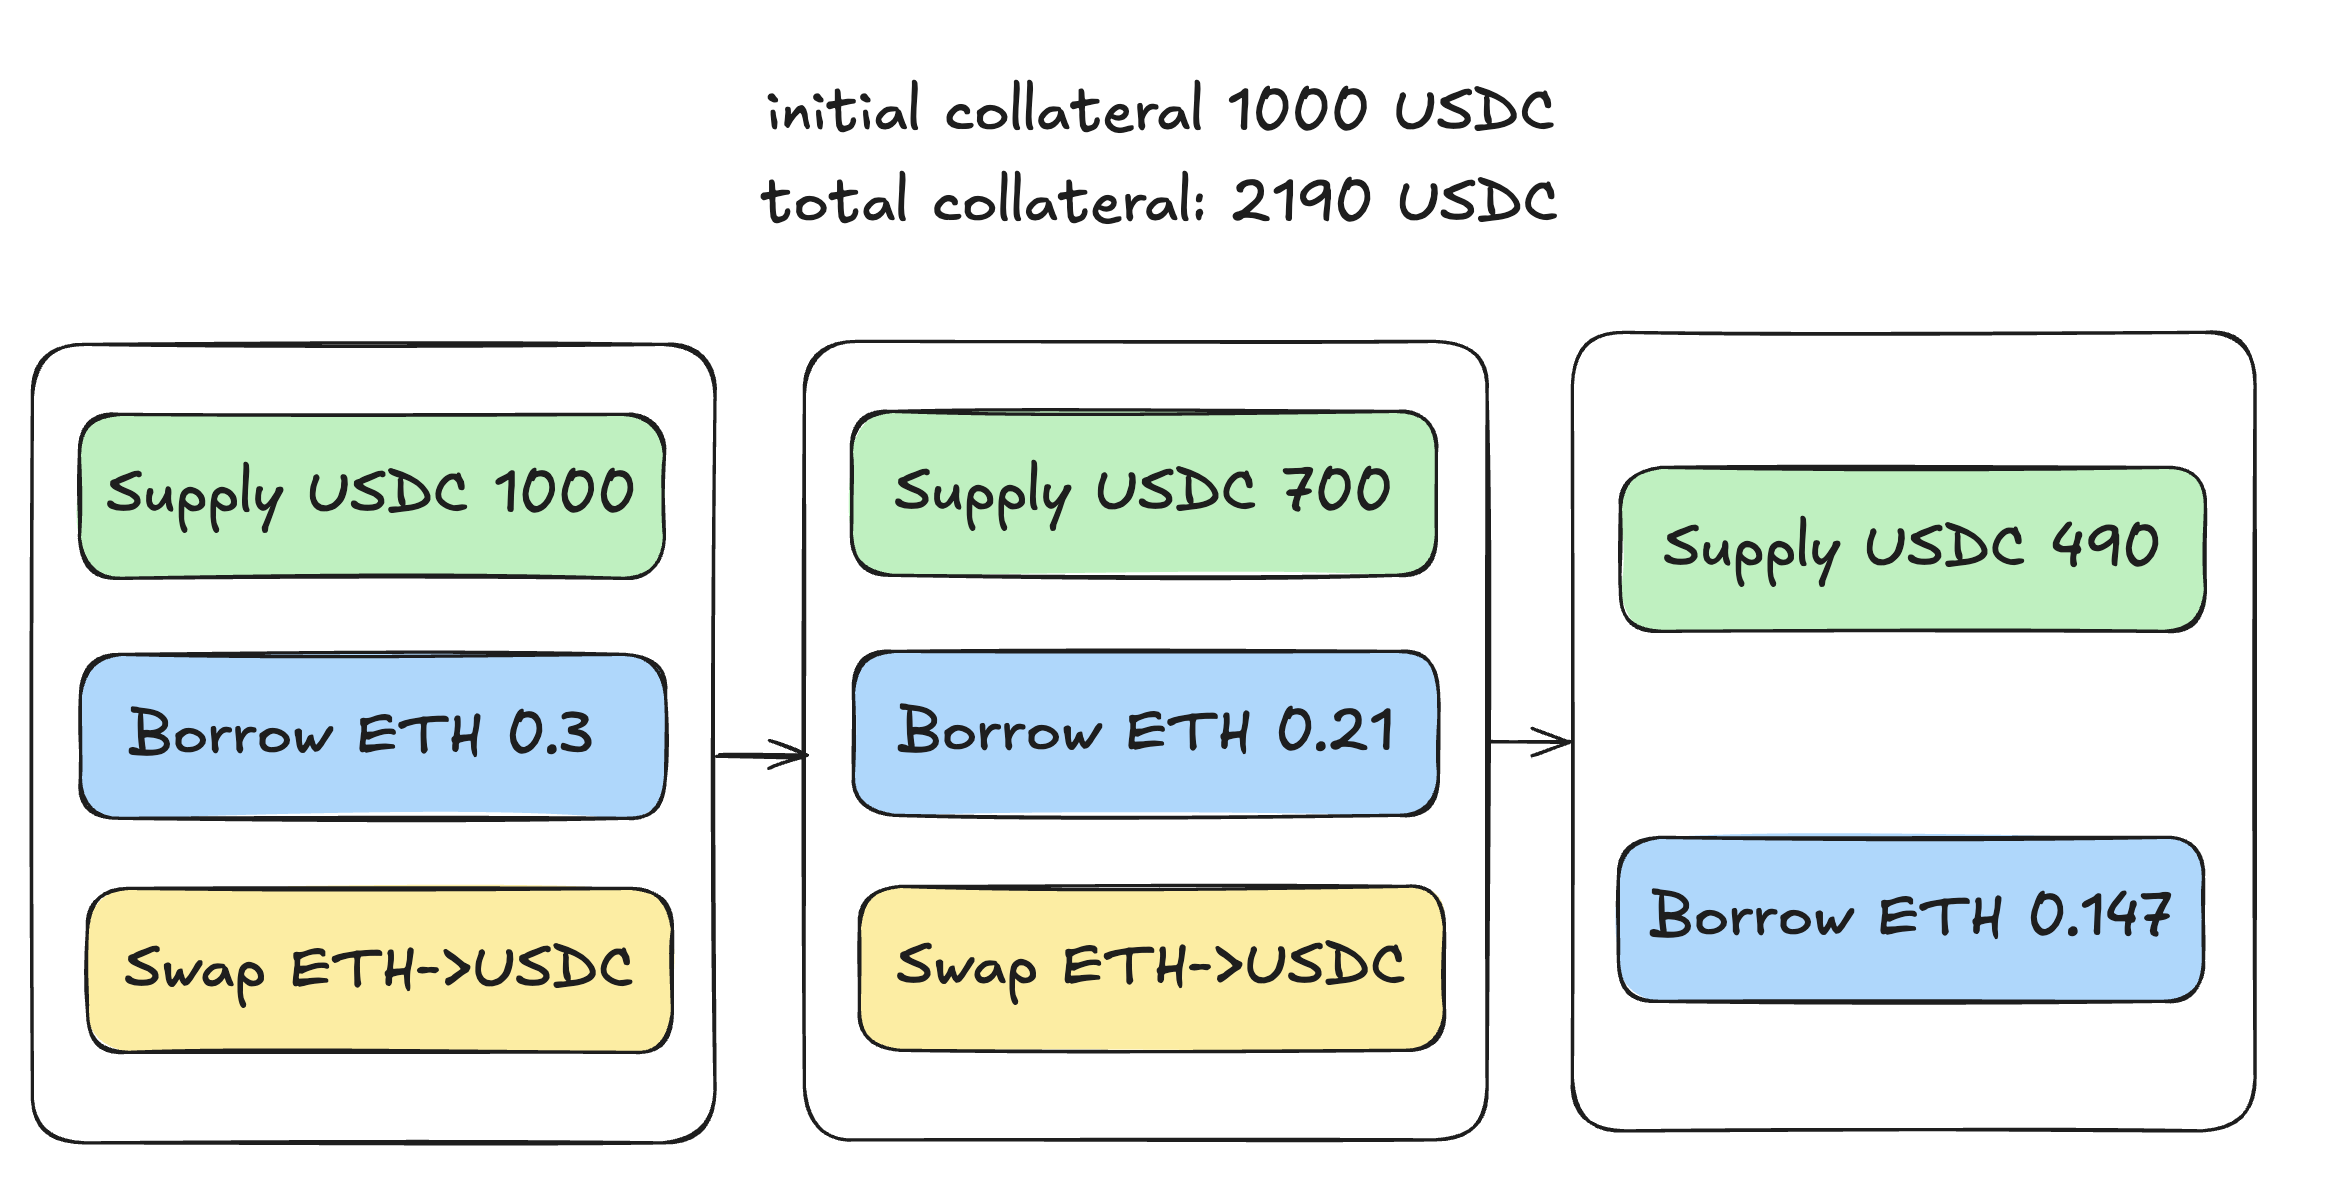
This illustration demonstrates AAVE looping strategy with the following parameters, assuming that the price of ETH is 2333 USDC:
In this example, you’re depositing USDC, borrowing ETH, swapping it back into USDC, and re-supplying — on repeat — to achieve a target leverage (e.g. 2.19x). Compass bundles all of this into one atomic transaction.
This illustration demonstrates AAVE looping strategy with the following parameters, assuming that the price of ETH is 2333 USDC:
Example
In this example, you’re depositing USDC, borrowing ETH, swapping it back into USDC, and re-supplying — on repeat — to achieve a target leverage (e.g. 2.19x). Compass bundles all of this into one atomic transaction.
This illustration demonstrates AAVE looping strategy with the following parameters, assuming that the price of ETH is 2333 USDC:
- Collateral Asset: USDC
- Loan Asset: ETH
- Initial Collateral Amount: 1000 USDC
- Loan to Value Ratio: 70%
- Leverage: 2.19x
Prerequisites
1
Install Dependencies
Install the required packages:
2
Set Environment Variables
Create a
.env file in your project root:Implementation Guide
1
Import dependencies and load environment
First, import the necessary dependencies and load your environment variables.
2
Initialize SDK, Wallet, and Account
Set up the Compass API SDK, create your wallet client, and initialize your account.
3
Get and sign authorization for transaction batching
Before you can execute Aave looping, you need to get an authorization from the Compass API and sign it with your private key. This ensures only you can execute the batch.
4
Configure the Aave looping transaction
Configure the Aave looping strategy and prepare the transaction using the Compass API SDK.
5
Sign and broadcast the transaction
Sign the returned transaction with your private key and broadcast it to the network. This is the final step to actually send your Aave looping transaction to Ethereum.
Full Code
Here is the full script from the tutorial. Copy and paste in your code editor and play around!Understanding the Parameters
Let’s break down the key parameters for the AAVE looping strategy:AAVE Loop Parameters
- collateral_token: The token you want to supply as collateral (e.g., “USDC”, “WETH”, “WBTC”)
- borrow_token: The token you want to borrow (e.g., “WETH”, “USDC”)
- initial_collateral_amount: The amount of collateral token to supply initially
- multiplier: The leverage multiplier (e.g., 2.0 means double exposure)
- max_slippage_percent: Maximum allowed slippage for token swaps (1-100)
- loan_to_value: The loan-to-value ratio in percentage (0-100)
The loan-to-value (LTV) ratio determines how much you can borrow against your collateral. For example, if LTV is 80%, you can borrow up to 80% of your collateral’s value. Be cautious with high LTV ratios as they increase liquidation risk.The maximum possible multiplier is determined by the formula:
1 / (1 - loan_to_value/100). For example, with an LTV of 80%, the maximum multiplier would be 1 / (1 - 80/100) = 1 / 0.2 = 5. This represents the theoretical maximum leverage possible at that LTV ratio.